
Dead Cells Guide - First Steps on the Sick Island. Part Two.
Dead Cells guide - First steps on the diseased island. Part Two: What a Dead Cells build consists of
In the first part of the guide, we gave primary instructions in an accessible form for any user. The second part of the guide is dedicated to the exclusion of the word "Build".
A build is a set of weapons, armor and abilities, which in combination are more effective than each of the named elements separately. All builds are based on the principle of synergy, i.e. on interdependent combinations.
Weapons and active items
Universal builds, as a rule, do not exist. In Rogue-lite, the player cannot buy all the necessary items at once, because they appear in random order. Sometimes the desired item may just not get on the way, then you have to use what is available. The newcomer and the experienced player differ in their ability to think creatively and find something for themselves. This rule works in Dead Cells like a Swiss watch. Here's a picture of the build:
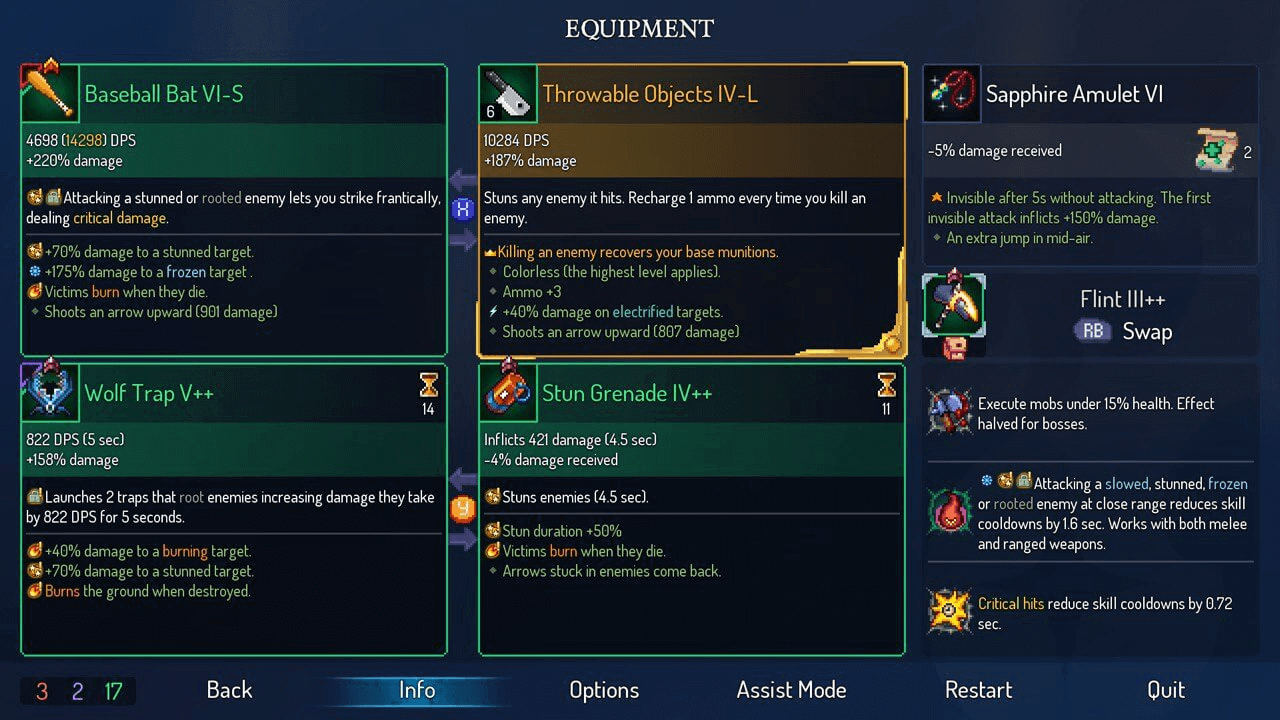
But the screenshot shows weapons in the first slot, secondary weapons, two skills, amulet and mutations. In Dead Cells, weapons are not divided into primary and secondary, all weapons can do damage and kill. The division into "Primary Weapon" and "Support Weapon" was invented by the players themselves. The game does not provide enough resources for both weapons to deal decent damage. There are exceptions, but they are rare...
Now let's take apart the screenshot under the magnifying glass, starting with the weapons:
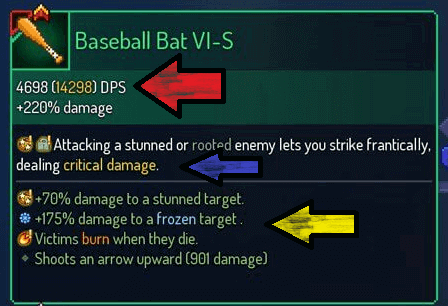
The red arrow indicates pure damage per second. That is, this is the damage that the weapon does not take into account the effects.
The blue arrow marks the weapon's main feature. The baseball bat does random damage to immobilized enemies. It is not always possible to understand this trick from the text description. The throwing weapons "Cross" and "Boomerang", for example, have phenomenal potential, but according to the description these guns are unremarkable.
The yellow arrow marks affixes, that is, additional properties of the weapon, in addition to the main innate feature. Picking up the right affixes is a third of the success in the race. In the screenshot above, you can see that the affix makes the bat deal 70% more damage to stunned enemies. There are many ways to stun an enemy in this build, which gives +70% damage on an almost permanent basis.
Weapons and items also have levels and quality. Level is the damage of the item, and quality is the number of extra properties, affixes.

The orange line indicates weapon level, the white line indicates quality. Quality can be marked with "+" or "++", and the quality "S" is the highest, which can be pumped yourself. But there is a unique quality, it is found only in the legendary versions of items, this quality is "L", i.e. "Legendary":
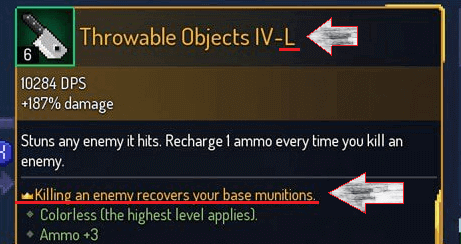
Legendary gear is good because it has a legendary affix. No matter what quality you find the legendary gear in, no matter how many modifiers you change, the legendary affix remains intact. The rule applies to weapons and items as well.
But the most useful thing about legendary quality is that you can take a duplicate of the same item: you can have the same items in the first and second slots, but one of them will be legendary and the other will be regular. I recommend that you memorize this trick. This knowledge will be very useful to you, but very soon...
Mutations
The second part of the build is mutations. Mutations are passive skills, which multiply the strength of the protagonist if you pick them up correctly.
Mutations are not in-game items, you can take them in the transitions between levels for free. Only 3 mutations can be taken at a time. Exactly one pumped mutation per passed room. However, change the set of mutations already cost money, so do not try everything in a row, it is not profitable.
Many mutations are divided by color and gain strength from characteristics: Brutality, Tactics, and Vitality. It works like this: The Assassin mutation adds 10% after killing mobs if you have 1 Brutality point. With each Brutality point the "Assassin" mutation will add more and more percentages: first 15%, then 17%, then 17.5% in descending order. The more points, the lower the gain from the next scroll. Speaking of scrolls...
Scrolls
Scrolls are the most important element of the build. Scrolls are found in locations and look something like this:
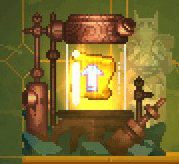
A matched arrow scroll allows you to pump up Brutality, Tactics, and Vivacity of your choice. There are also scrolls with only two characteristics to choose from. This is where the fun part comes in...
Scrolls work like this: You have a weapon for Brutality, which deals 100 damage if you have 1 point of Brutality. The next Brutality scroll you pick up will add damage to the sword and increase the protagonist's health by 65%. Each subsequent scroll of the same color reduces the health bonus, but increases the damage bonus. Works like a snowball.
...And herein lies the most important aspect of Dead Cells: understanding the role of these scrolls. It's not explicitly stated anywhere in the game, but each of the three scrolls symbolizes one of the game's styles.
Brutality is full of quick melee weapons with bleeding, arson, and poison effects. Brutality items are the fastest. However, weapon attacks in Brutality are interrupted by taking damage. When compared to classic RPGs, Brutality is a Robber class.
The tactic leans heavily on ranged combat. The tactic is for those who don't like head-to-head encounters, but rely on agility, traps, and bindings. To play Tactics effectively, it's vital to be able to move properly rather than hit accurately. When compared to classic roleplaying games, Tactics are Hunter, Archer, and sometimes Blacksmith.
Livability is a branch for tanks. In survivability there are enough weapons with incredibly powerful single damage, but not so much lightweight gear. Brutality is full of items with vampirism, freeze, and stun effects. The extra health bonuses are there, too. If you compare it to classic role-playing games, Vivacity is a Warrior, Gladiator, or Duellist.
When you first encounter the game, you are 90% likely to play through Brutality. Initially Dead Cells will seem to be an easy game to play, because your opponents will have little health, and the treatment will be full. For a beginner, there's nothing better than Brutality: the game gives all the necessary Brutality mutations at once, and many of the standard weapons get stronger with each new Brutality scroll.
Initially you don't need area control, enemies hardly ever punish close up - you don't need the benefits of Tactics initially.
You don't initially need huge, lumpy damage; bosses can be killed without stun effects. Even if in every room you spend all the health elixir charges, you don't risk to find yourself without healing - the Vitalism branch is not so useful initially.
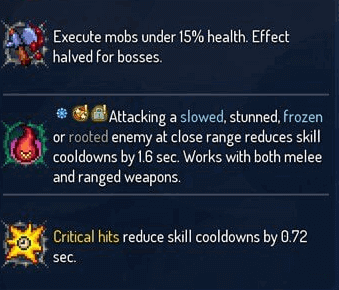
Look at the first screenshot of the article. Look at the bottom left corner. What do we see there? This:

Dead Cells is not the kind of Rogue-lite where you have to boast that you made it through the game in just a couple or three tries. Dead Cells is the kind of Rogue-lite where you should boast about your knowledge of mechanics and personal skill. Dead Cells is the game where the developers don't consider it necessary to specify all the properties and limitations of the items in the description.
That's why your first attempts to pass the game shouldn't be successful. You need to try different weapons, to find the best combinations, to try, to make mistakes and to win - this is the philosophy of Dead Cells...
Your first few runs will be spent just trying out a weapon or two. They don't have to be weapons for Brutality. The only prerequisite is that you have to be comfortable using them. Subsequently, starting a new run, you will be looking for exactly the same weapon.
Most items have not one color, but two. That is, such a weapon/item can become stronger from two different scrolls. The icon of such items looks like this:
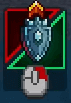
Note that such items get a bonus not from two characteristics at once, but from the most rolled one. So it makes no sense to level up Brutality and toughness with such a shield; either Brutality or toughness.
Backpack
Again, look at the first screenshot of the article. This time to the center of the right corner:

Initially it is unavailable. You need to spend 100 cells to unlock it. On its own the backpack does not bring much practical benefit, but it becomes really useful with the "Wild Backpack", "Acro Backpack" and "Armored Backpack" mutations. This gives you essentially half a slot: the weapon in the backpack will deal some damage when rolling, the ranged weapon will start shooting, and the shield in the backpack will start parrying hits and flying projectiles.
This trick is very useful, but I wouldn't recommend to the beginners to fill up their heads with all sorts of "Armor Backpacks". For the beginners I would recommend to use the backpack only to shuffle different weapons and figure out what's better.
Amulets
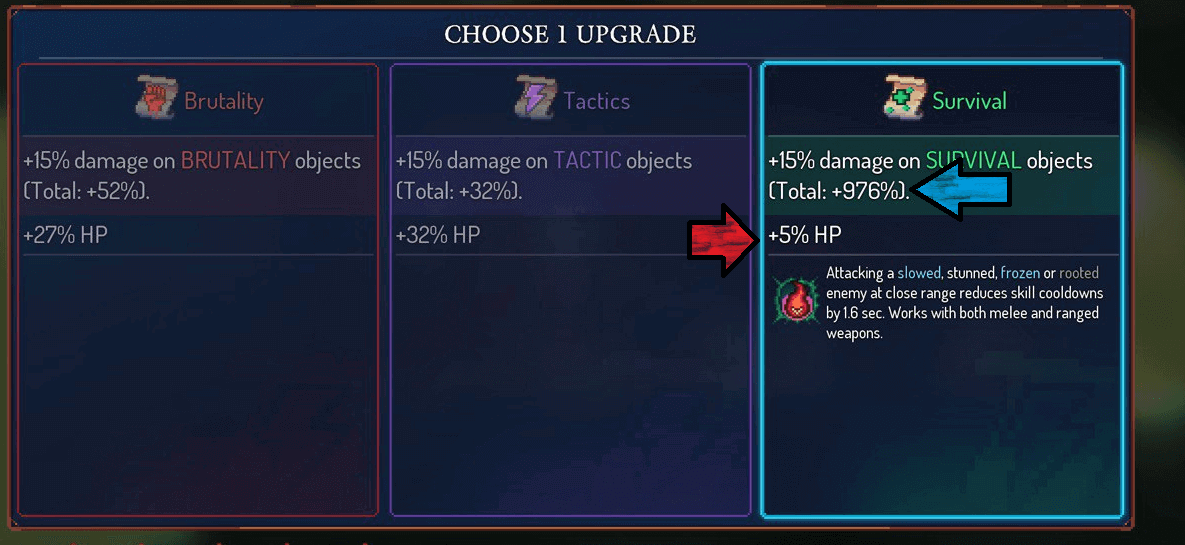
And the last element of the build is the amulet. In the first screenshot of the article it is in the upper right corner. Here it is:
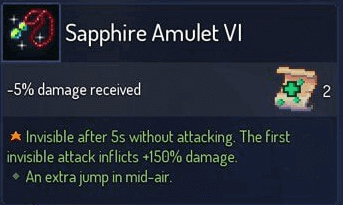
Amulets are dropped from elite enemies and Portals of Challenge. Amulets reduce damage, add a trait to jump mechanics, sometimes make the protagonist invisible, sometimes give additional jumps in the air, and sometimes give back the damage they deal to enemies like the "Spiked Carapace" of Nyx Assassin from Dota 2.
In addition, good amulets also contain scrolls. The higher the amulet level, the more bonus scrolls they give. It is not necessary to worry about amulets scrolls beginner. There is no way to control the scroll fallout, so there is no way to choose a wrong amulet. Anything but the standard prisoner's shackles.
And now it's time to start...?
After reading the guide for two-thirds, you understand what happens in Dead Cells, learn how not to make the stupidest mistakes, and get an initial idea about the role-playing system here. At least you won't get lost in the interface...
...But the third part of the guide is dedicated to the subtleties that are often omitted. Learn them from experience or read the final part - the choice is yours.
